The AST PRO REST API lets you add, retrieve, and delete shipment tracking on WooCommerce orders programmatically. It is designed for shipping software, ERPs, OMS platforms, and 3PL providers. All endpoints require HTTPS and WooCommerce REST API credentials.
Authentication
All requests use HTTP Basic Auth with a WooCommerce Consumer Key and Consumer Secret. The account used to generate the keys must have the manage_woocommerce capability — the Administrator role has this by default; Shop Manager also works.
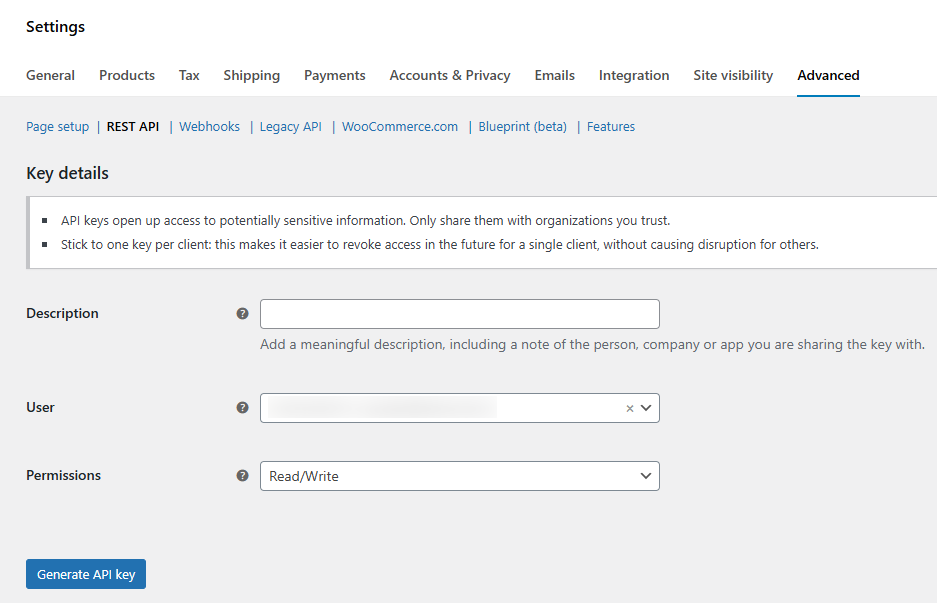
- 1Go to WooCommerce → Settings → Advanced → REST API.
- 2Click Add key.
- 3Give it a name, select a user with Administrator or Shop Manager role, and set Permissions to Read/Write.
- 4Click Generate API key. Copy the Consumer Key and Consumer Secret — the secret is shown only once.
Endpoints and namespaces
AST PRO exposes endpoints under two namespaces:
| Namespace | Use |
|---|---|
/wp-json/wc-shipment-tracking/v3/ | Standard tracking operations — add, get, delete tracking; list carriers. Use this for all single-order and bulk operations. |
/wp-json/wc-ast-pro/v3/ | Per-item (Tracking Per Item) tracking only — use when assigning tracking to specific SKUs within an order. |
API fields reference
| Field | Type | Required | Description |
|---|---|---|---|
order_id | integer | Yes | WooCommerce order ID. With HPOS enabled this is the order ID, not the post ID. |
tracking_provider | string | Yes | Carrier name — must match an enabled carrier name or a configured API alias exactly (case-sensitive). |
tracking_number | string | Yes | The shipment tracking number. |
date_shipped | string | No | Shipment date. Format must match the API Date Format setting: DD-MM-YYYY or MM-DD-YYYY. If omitted or mismatched, the current date is used. |
status_shipped | integer | No | 0 = no status change; 1 = mark as Shipped; 2 = mark as Partially Shipped. Default: 0. |
replace_tracking | boolean | No | 0 = add to existing tracking; 1 = replace all existing tracking. Default: 0. |
sku | string | No | Comma-separated SKUs for per-item tracking (use wc-ast-pro/v3 namespace). |
qty | string | No | Comma-separated quantities matching the SKUs above. |
shipping_note | string | No | Customer-visible note shown alongside tracking details. |
Add tracking to an order
POST /wp-json/wc-shipment-tracking/v3/orders/{order_id}/shipment-trackings/curl -X POST https://your-domain.com/wp-json/wc-shipment-tracking/v3/orders/340/shipment-trackings/ \
-u consumer_key:consumer_secret \
-H "Content-Type: application/json" \
-d '{
"tracking_provider": "FedEx",
"tracking_number": "12345678",
"date_shipped": "08-07-2025",
"status_shipped": 1,
"shipping_note": "Your order has shipped."
}'Response — returns the new tracking ID string:
"Tracking ID: fb7170d97d0e628bc3b565999d07c6a9"Add tracking per order item (Tracking Per Item)
Use the wc-ast-pro/v3 namespace and include sku and qty to assign tracking to specific items. Requires Tracking Per Item enabled in General Settings.
POST /wp-json/wc-ast-pro/v3/orders/{order_id}/shipment-trackingsFirst package (partial shipment):
curl -X POST https://your-domain.com/wp-json/wc-ast-pro/v3/orders/340/shipment-trackings \
-u consumer_key:consumer_secret \
-H "Content-Type: application/json" \
-d '{
  "tracking_provider": "USPS",
  "tracking_number": "123456",
  "date_shipped": "10-07-2025",
  "status_shipped": 2,
  "sku": "t-shirt,blue-jeans",
  "qty": "1,1",
  "shipping_note": "Partial shipment — remaining items ship soon."
}'
Second package (remaining items — use standard namespace):
curl -X POST https://your-domain.com/wp-json/wc-shipment-tracking/v3/orders/340/shipment-trackings/ \
-u consumer_key:consumer_secret \
-H "Content-Type: application/json" \
-d '{
  "tracking_provider": "USPS",
  "tracking_number": "456879",
  "date_shipped": "12-07-2025",
  "status_shipped": 1,
  "sku": "blue-jeans",
  "qty": "1",
  "shipping_note": "Final shipment."
}'
Get tracking for an order
GET /wp-json/wc-shipment-tracking/v3/orders/{order_id}/shipment-trackings/curl -X GET https://your-domain.com/wp-json/wc-shipment-tracking/v3/orders/340/shipment-trackings/ \
-u consumer_key:consumer_secretResponse — an array of tracking objects for the order:
[
  {
    "tracking_id": "feb9bde4475fda92cc9408607b7ecb66",
    "tracking_provider": "FedEx",
    "tracking_link": "https://www.fedex.com/fedextrack/?trknbr=12345678",
    "tracking_number": "12345678",
    "date_shipped": "2025-07-08"
  }
]
Delete tracking
DELETE /wp-json/wc-shipment-tracking/v3/orders/{order_id}/shipment-trackings/{tracking_id}curl -X DELETE https://your-domain.com/wp-json/wc-shipment-tracking/v3/orders/340/shipment-trackings/fa61d174a05d2f34323b51d92823947d \
-u consumer_key:consumer_secretResponse:
"Tracking ID: fa61d174a05d2f34323b51d92823947d"Get available carriers
GET /wp-json/wc-shipment-tracking/v3/orders/{order_id}/shipment-trackings/providerscurl -X GET https://your-domain.com/wp-json/wc-shipment-tracking/v3/orders/340/shipment-trackings/providers \
-u consumer_key:consumer_secretBulk add tracking
Add tracking for multiple orders in a single request. Each object in the shipments array follows the same field schema as the single-order endpoint.
POST /wp-json/wc-shipment-tracking/v3/orders/shipment-trackings/bulkcurl -X POST https://your-domain.com/wp-json/wc-shipment-tracking/v3/orders/shipment-trackings/bulk \
-u consumer_key:consumer_secret \
-H "Content-Type: application/json" \
-d '{
"shipments": [
{
"order_id": 677,
"tracking_provider": "FedEx",
"tracking_number": "FDX-1110",
"date_shipped": "08-07-2025",
"status_shipped": 1
},
{
"order_id": 675,
"tracking_provider": "UPS",
"tracking_number": "UPS-2220",
"date_shipped": "09-07-2025",
"status_shipped": 1
}
]
}'A failed entry returns an error object for that shipment but does not stop the rest of the batch from processing.
Postman setup
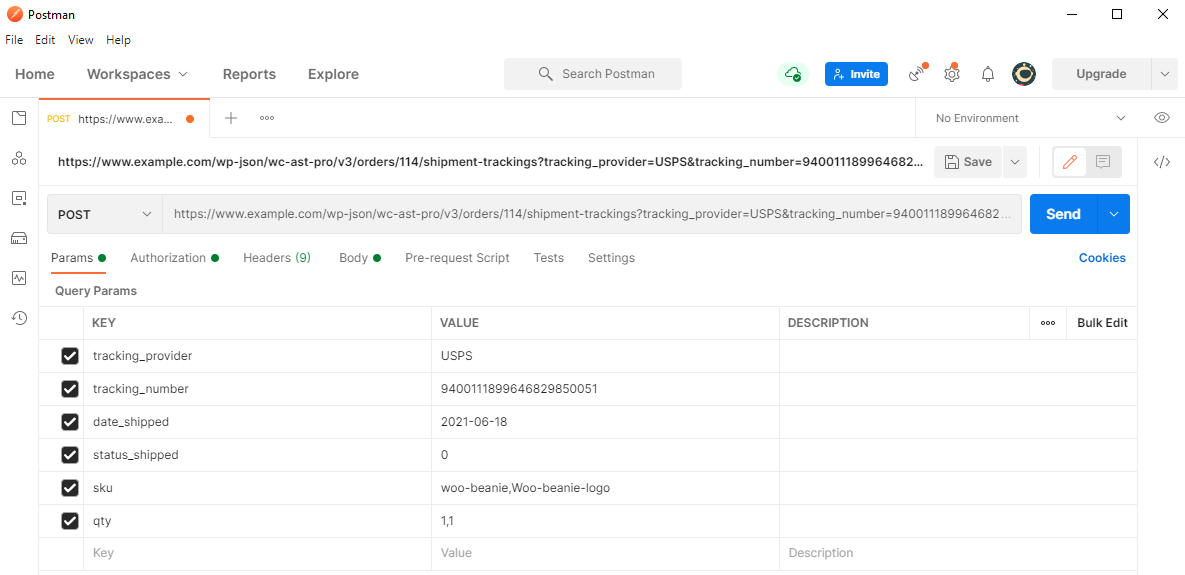
- 1Set method to POST and URL to
https://your-domain.com/wp-json/wc-shipment-tracking/v3/orders/340/shipment-trackings/ - 2Under Authorization, select Basic Auth. Enter your Consumer Key as Username and Consumer Secret as Password.
- 3Under Headers, add
Content-Type: application/json. - 4Under Body → Raw → JSON, paste your request body.
- 5Click Send. A successful response includes a
Tracking ID.

Error codes
| Status | Meaning | Common cause |
|---|---|---|
200 OK | Success | Request completed. |
201 Created | Tracking added | New tracking entry created. |
400 Bad Request | Invalid request | Missing required field or malformed JSON — check tracking_provider, tracking_number, and date format. |
401 Unauthorized | Auth failed | Consumer Key or Secret incorrect, or key lacks Read/Write permission. |
403 Forbidden | Access denied | The user account associated with the key lacks manage_woocommerce. |
404 Not Found | Not found | Order ID does not exist, or endpoint URL is wrong. |
409 Conflict | Duplicate | Tracking number already exists on this order and replace_tracking is not set to 1. |
500 Server Error | Server error | Check WooCommerce → Status → Logs for details. |