Manage customer verification status and perform bulk actions from the WordPress admin.
- Go to Users → All Users.
- The Email Verification column shows each user’s status (Verified, Unverified, or Pending paid order if you use Paid-Order Gatekeeping).
- Use the User verification filter dropdown above the table to show only Verified, Unverified, or Pending paid order users.
- Go to Users → All Users.
- Find the customer, then in the Actions column click Verify to mark that one account verified immediately.
- To verify several at once, tick their checkboxes, choose Verify users email from the Bulk actions dropdown, and click Apply.
The same Bulk actions dropdown on Users → All Users also has two more options:
| Bulk action | What it does |
|---|---|
| Force activate (skip paid-order requirement) | Flips selected pending paid order customers straight to fully verified, without waiting for their first paid order. See Settings for how Paid-Order Gatekeeping works. |
| Force re-verify selected users | Resets selected customers back to unverified, so they’re prompted to verify again on next login. See Maintenance for the store-wide version of this tool. |
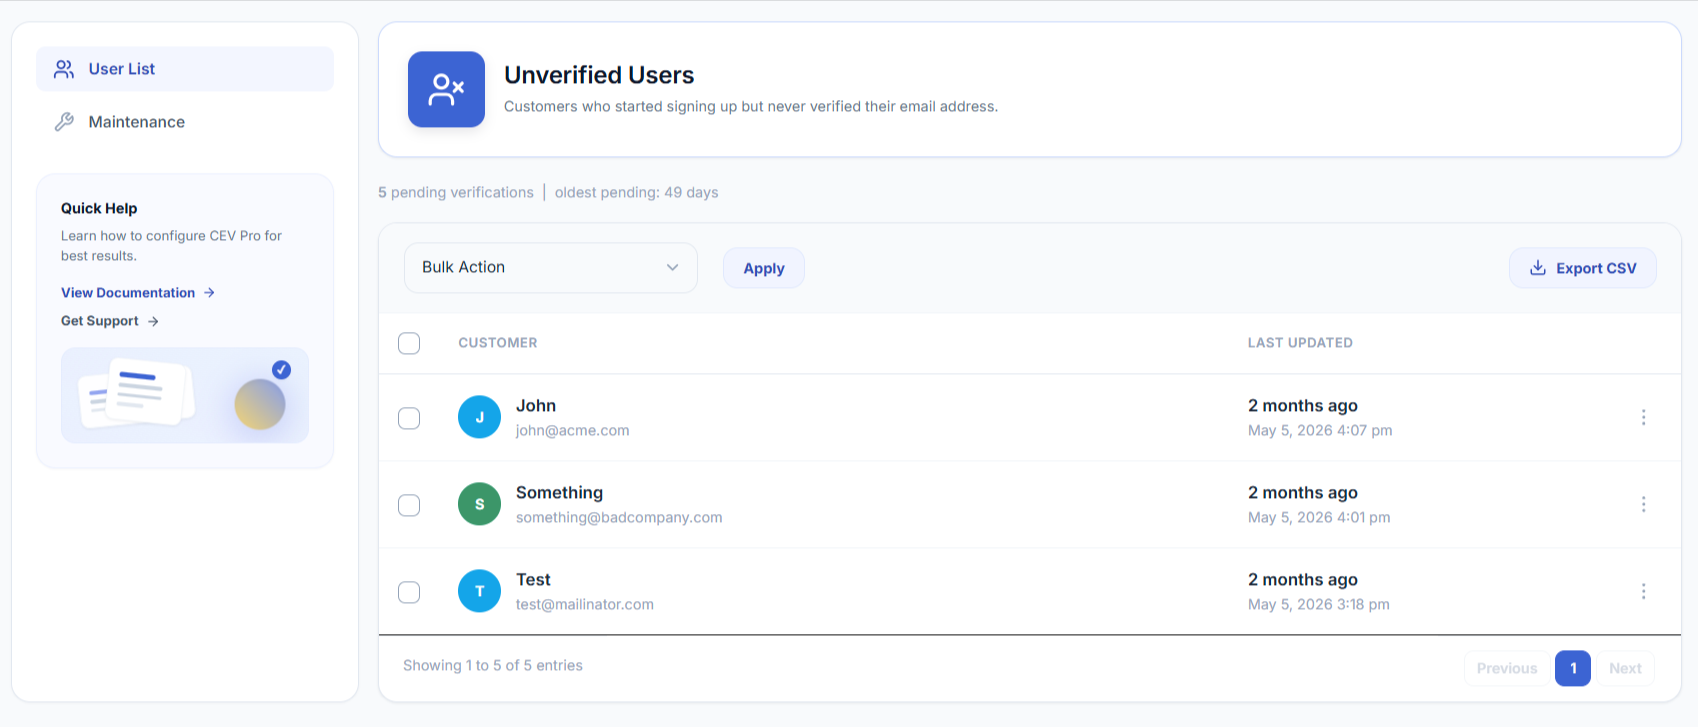
The Unverified Users tab lists every email that started verification but didn’t finish — both registered customers and guest checkout entries. From here you can resend reminders, export data, or remove rows in bulk.
You’ll find it at Settings → Unverified Users → User List.
How to View Unverified Users?
- Go to Settings → Unverified Users → User List.
- The table shows pending verifications with the customer’s name, email, the date they last attempted verification, and their risk score.
- The header strip displays pending count + oldest pending age at a glance.
What Does the Risk Column Show?
The Risk column shows the score that AI risk scoring gave each pending sign-up when it was submitted — a single number from 0 to 100, colour-coded by the action that was taken:
| Chip | Meaning |
|---|---|
| Green | Low risk — the sign-up was allowed through with no extra friction |
| Amber | Medium risk — the sign-up was asked for a one-time code |
| Red | High risk — the sign-up was blocked |
| — (dash) | No score on record for this entry |
Hover the chip to see the reasons behind the score. The possible reasons are:
| Reason | What it means |
|---|---|
| Random-looking mailbox | The part before the @ looks machine-generated rather than human-chosen |
| Unusual domain | A non-mainstream domain whose name looks randomly generated or throwaway-shaped |
| Role / plus address | A role mailbox or plus-address pattern often used to farm multiple accounts |
| Many signups from one IP | Several different addresses were submitted from the same IP in a short period |
How to Send a Reminder Email to a Specific User?
- Go to Settings → Unverified Users → User List.
- Find the row for the customer.
- Click the kebab menu (⋮) at the right of the row.
- Click Send reminder. The customizer-defined re-engagement email is sent to that customer immediately.
How to Send Reminders to Multiple Users at Once?
- Go to Settings → Unverified Users → User List.
- Tick the checkboxes next to the users you want to email.
- From the Bulk Action dropdown, choose Send re-engagement reminder.
- Click Apply.
- Confirm the send in the modal that appears.
How to Delete an Unverified User Entry?
- Go to Settings → Unverified Users → User List.
- Click the kebab menu (⋮) on the row.
- Click Delete and confirm.
For bulk delete: tick multiple rows, choose Delete from the Bulk Action dropdown, click Apply, and confirm.
How to Export the Unverified User List to CSV?
- Go to Settings → Unverified Users → User List.
- Click Export CSV in the top-right of the records card.
- The file downloads with columns: ID, Email, Status, Last Updated.
Data Retention
Unlike some of the plugin’s other logs, this list is covered by a retention control: Maintenance‘s auto-cleanup cron can automatically delete stale rows from this same table after a retention window you choose. It’s off by default, so rows otherwise accumulate indefinitely until you enable it or delete them yourself.