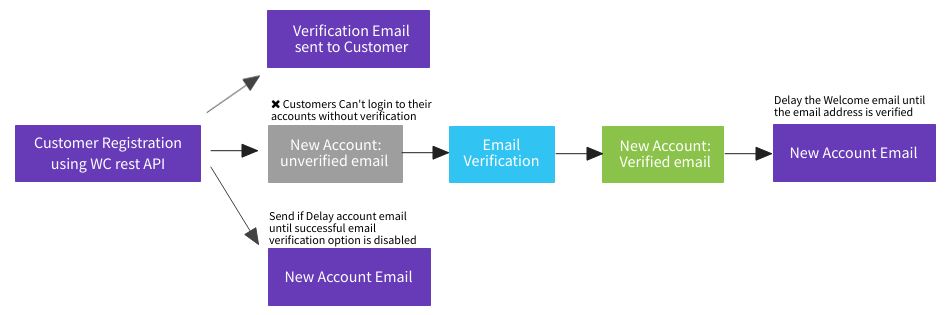
- When you create a customer via the REST API, the account has no verified flag and is treated as unverified, the same as any other new account.
- When the customer logs in to their account, a verification popup displays on all account pages, letting them enter a verification code to verify their email and activate their account.
- The verification code and a verification link are sent to the new customer’s email address, and they can verify by entering the code or clicking the Verification link in the email.
- Once the customer verifies their email, they’re redirected to the account dashboard (or another page you choose), and the account is flagged as Verified Email.
How to Create Customers for WooCommerce REST API?
Creating customers for WooCommerce via the REST API is a useful feature that allows developers to automate the process of adding new customers to their WooCommerce store programmatically. Here’s a step-by-step guide on how to achieve this:
Before you can start using the WooCommerce REST API, you need to generate API credentials from your WooCommerce store. To do this, log in to your WordPress admin dashboard and navigate to WooCommerce > Settings > Advanced > REST API. Create a new API key, specifying the access level and permissions you want to grant to the API.
You can interact with the WooCommerce REST API using any programming language that can make HTTP requests. The example below uses Python’s requests library; the same concepts apply in any other language.
To create a new customer, send a POST request to the WooCommerce API endpoint responsible for handling customer data:
https://yourdomain.com/wp-json/wc/v3/customersimport requests
url = "https://yourdomain.com/wp-json/wc/v3/customers"
data = {
"email": "[email protected]",
"first_name": "Jane",
"last_name": "Doe",
"username": "janedoe",
}
response = requests.post(
url,
json=data,
auth=("consumer_key", "consumer_secret"), # from WooCommerce > Settings > Advanced > REST API
)
print(response.status_code, response.json())See WooCommerce’s REST API documentation for creating a customer for the full list of fields and response format.
Marking API-Created Customers as Verified
If you’re importing or provisioning customers you already trust (a migration, a B2B onboarding tool, etc.) and don’t want them to see the verification popup, mark them verified right after creation instead of waiting for them to complete OTP verification.
CEV Pro’s own registration hook runs during customer creation and leaves new accounts unverified by default, so set the meta afterward using WooCommerce’s own REST hook, which fires once the customer record is fully created:
add_action( 'woocommerce_rest_insert_customer', function ( $customer, $request, $creating ) {
    if ( $creating ) {
        update_user_meta( $customer->get_id(), 'customer_email_verified', 'true' );
    }
}, 10, 3 );
Add this snippet in a custom plugin or your theme’s functions.php. See Developers for the full reference on customer_email_verified‘s possible values (true, pending_paid_order, or absent/unverified) and the is_user_email_verified() helper for checking status in your own code.
Troubleshooting
- A bulk import is flooding out verification or re-engagement emails — each imported customer with no verified flag is a candidate for both the login-time verification popup and, if enabled, re-engagement reminders. Before a large import, either mark the imported customers verified using the snippet above, or temporarily turn off “Send re-engagement reminder emails” until the import is finished.
Related
- Compatibility — all supported plugins.
- Developers — hooks, filters, and the verification-status reference.