Customer Email Verification Pro includes several independent layers of spam protection that run before the OTP is sent — disposable email blocking (with optional AI pattern matching), MX record validation, a B2B allowlist, a custom blocked-emails list, AI risk scoring, and bot-cluster detection. Each layer is a separate toggle, so you can enable only the ones you need — all seven are off by default.
How to Block Disposable / Temporary Emails?
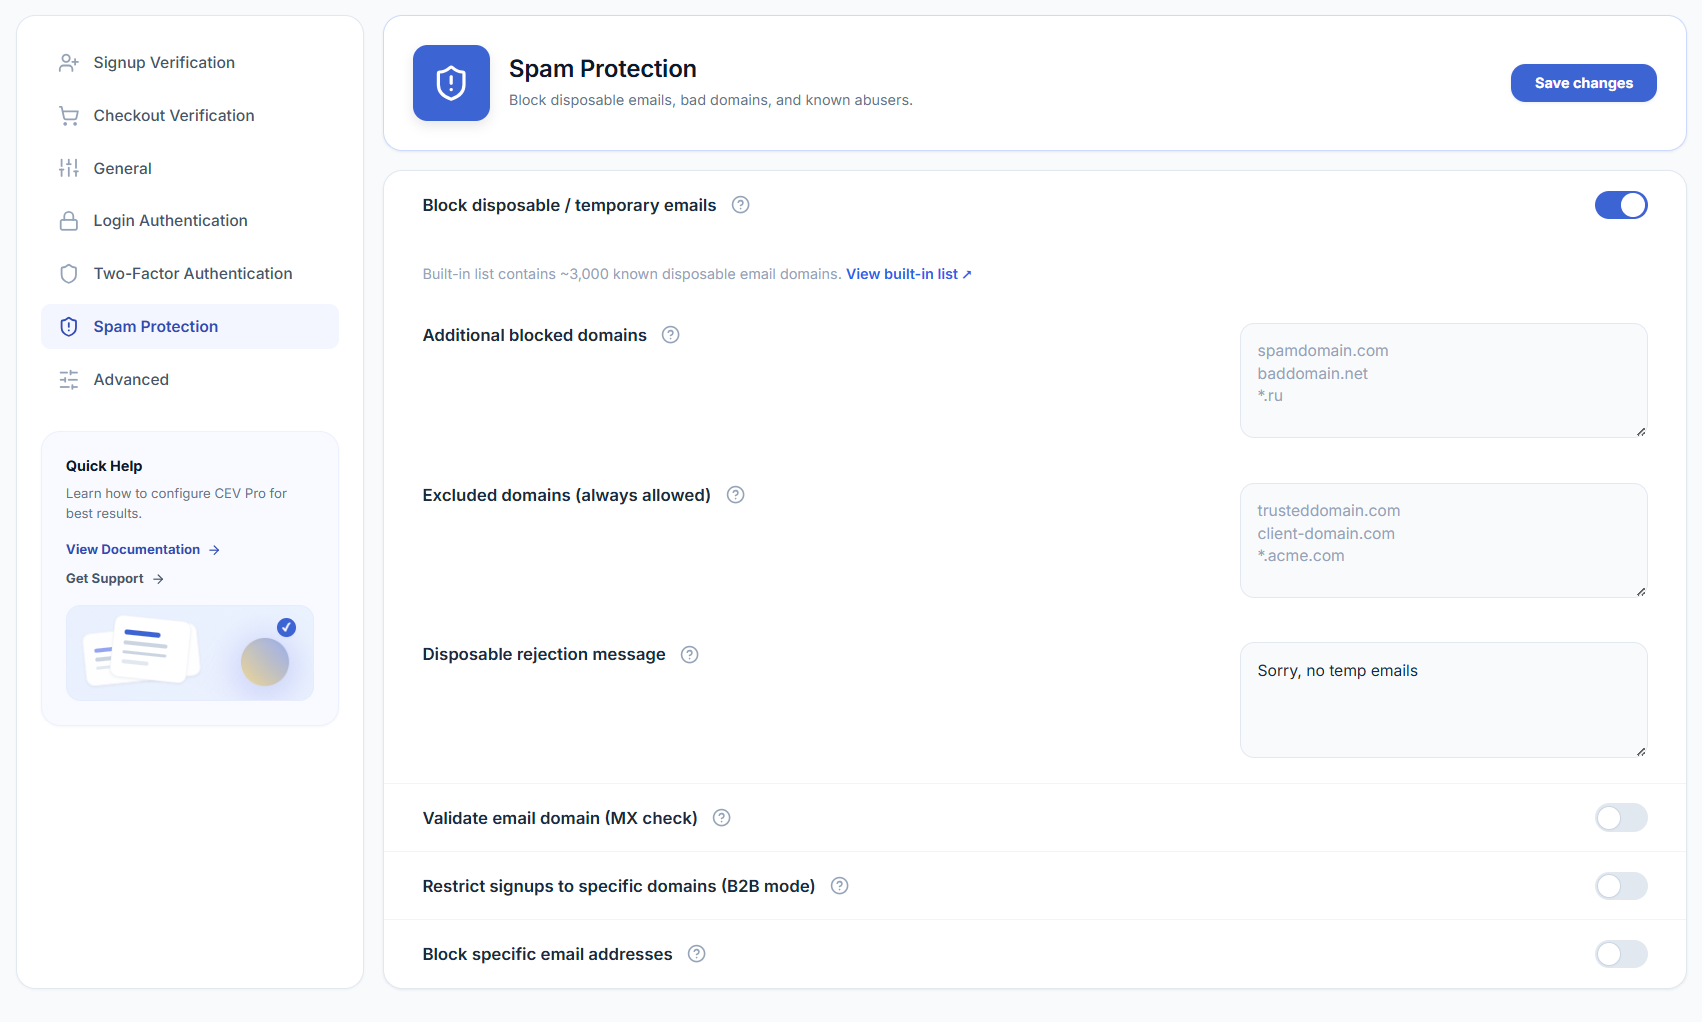
The plugin ships with a built-in list of ~430 known disposable email domains (Mailinator, 10MinuteMail, GuerrillaMail, etc.), current as of this version. When this rule is on, sign-ups from any of those domains are rejected before an OTP is sent.
- Go to WooCommerce → Email Verification → Settings → Spam Protection.
- Enable the toggle Block disposable / temporary emails.
- (Optional) Add extra domains to Additional blocked domains — one per line.
- (Optional) Add domains to Excluded domains to whitelist them even if they’re on the built-in list.
- Customize the rejection message shown to users.
- Click Save.
How to Catch Unknown Disposable Domains (AI Pattern Match)?
New temp-mail services appear faster than any static list can keep up with. The AI pattern match option sits inside the disposable block and inspects the shape of the domain instead of looking it up, so brand-new throwaway domains that aren’t on any list yet are still rejected — for example tempmail-new.xyz, trashbox24.info, or temp-box.io.
- Go to WooCommerce → Email Verification → Settings → Spam Protection.
- Make sure Block disposable / temporary emails is ON — the pattern matcher lives inside that block.
- Enable the toggle Also catch unknown disposable domains (AI pattern match).
- Click Save.
The pattern matcher uses the same Disposable rejection message as the built-in list, so there is nothing extra to configure. Mainstream mailbox providers (Gmail, Outlook, Yahoo, iCloud, Proton, Zoho, and similar) are never flagged, and anything in your Excluded domains list always wins.
How to Validate MX Records?
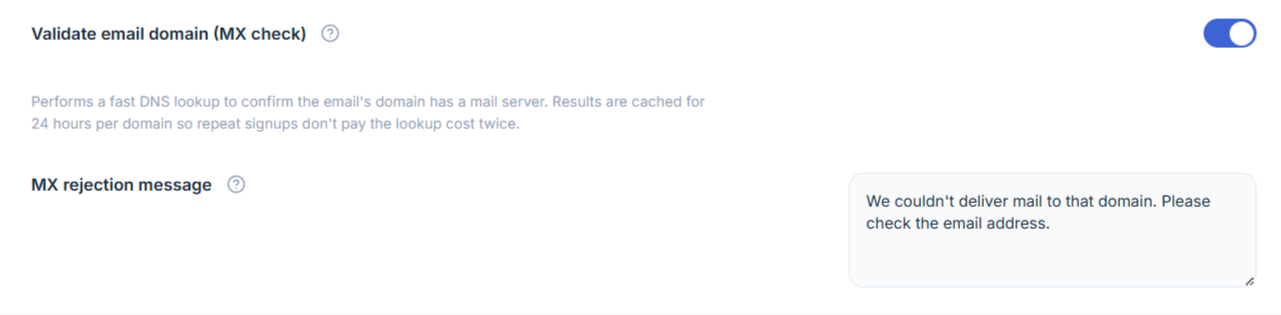
The MX check confirms the email’s domain has a working mail server. This catches typos like @gmial.com, fake domains like @example.test, and dead inboxes — before sending an OTP that would never be delivered.
- Go to WooCommerce → Email Verification → Settings → Spam Protection.
- Enable the toggle Validate email domain (MX check).
- Customize the MX rejection message if needed.
- Click Save.
How to Restrict Sign-ups to Specific Domains (B2B Mode)?
For B2B / corporate stores that should only accept sign-ups from approved company domains.
- Go to WooCommerce → Email Verification → Settings → Spam Protection.
- Enable the toggle Restrict signups to specific domains (B2B mode).
- In Allowed domains, add the domains that are permitted to register — one per line. Wildcards supported (e.g. acme.com, *.partner.com).
- Customize the Allowlist rejection message.
- Click Save.
How to Block Specific Email Addresses?
For blocking individual bad actors by their exact email.
- Go to WooCommerce → Email Verification → Settings → Spam Protection.
- Enable the toggle Block specific email addresses.
- Add full email addresses to Blocked email addresses — one per line, exact match (no wildcards).
- Customize the Blocked email rejection message.
- Click Save.
@spam.com), use the Additional blocked domains field inside the disposable section instead — it supports domain matching.
How to Enable AI Risk Scoring for Signups and Guest Checkout?
The rules above are yes/no gates: one bad trait and the sign-up is rejected. AI risk scoring works differently — it gives every registration and guest-checkout email a single score from 0 to 100, built from several weaker signals, and you decide what happens at each risk level. The signals are combined specifically so that one ordinary trait alone rarely reaches a block — but it can still happen on Strict sensitivity or in an unusual combination, so treat any block as a signal to check the reasons (see How to tell why a signup was blocked below), not as certain proof of spam.
Scoring runs entirely on your own server. There is no external service to sign up for and no API key. See Data retention & privacy at the end of this page for what is stored and for how long.
What the score is built from
| Signal | What it looks for |
|---|---|
| Random-looking mailbox | Keyboard-mash / machine-generated local parts such as xk29fjq8a@… |
| Unusual domain | A non-mainstream domain whose name looks randomly generated or throwaway-shaped |
| Role / plus address | Role mailboxes and plus-address abuse (admin+1@, info+promo@ and similar) |
| Many signups from one IP | Sign-up velocity — several different addresses submitted from the same IP in a short period |
Sensitivity and risk bands
Sensitivity sets the two score cutoffs that separate low, medium and high risk:
| Sensitivity | Medium risk from | High risk from |
|---|---|---|
| Low — only clearly risky signups | 55 | 85 |
| Balanced (recommended) | 40 | 70 |
| Strict — act on weaker combinations | 30 | 55 |
For each band you choose one of three actions: Allow, Require a one-time code, or Block. The defaults are a one-time code at medium risk and a block at high risk. Anything below the medium cutoff is always allowed through untouched.
- Go to WooCommerce → Email Verification → Settings → Spam Protection.
- Enable the toggle AI spam & fraud risk scoring.
- Choose a Risk sensitivity — Low, Balanced (recommended), or Strict.
- Set At medium risk — Allow, Require a one-time code (default), or Block.
- Set At high risk — Allow, Require a one-time code, or Block (default).
- Customize the Risk block rejection message shown when a sign-up is blocked.
- Click Save.
Once scoring is on, the Risk column on Settings → Unverified Users → User List shows each entry’s score and the reasons behind it, and the Analytics tab gains an AI risk scoring card with the average score, how many sign-ups were scored, how many were blocked, and the top risk reasons for the period.
How to Enable Bot-Cluster Detection?
Risk scoring judges one email at a time. Bot-cluster detection looks at sign-ups as a group and spots the shape of a coordinated bot run — a burst of registrations that only looks suspicious when you see them together. Once a burst crosses the cluster size for your sensitivity, further sign-ups matching that cluster are blocked.
What counts as a cluster
| Pattern | What it looks for |
|---|---|
| Network + fingerprint flood | Many different emails from the same network block sharing an identical browser fingerprint — bots rotate IPs within a subnet but keep the same browser signature |
| Address enumeration | Sequential addresses on the same domain: john1@, john2@, john3@ and so on |
| Domain flood | A burst of sign-ups all landing on the same non-mainstream domain |
Sensitivity
Sensitivity decides how many matching sign-ups form a cluster before new ones are blocked. All counts are measured over a rolling ten-minute window:
| Sensitivity | Network + fingerprint | Address enumeration | Domain flood |
|---|---|---|---|
| Low — only large, obvious bursts | 8 | 5 | 10 |
| Balanced (recommended) | 5 | 4 | 6 |
| Strict — block on smaller clusters | 3 | 3 | 4 |
- Go to WooCommerce → Email Verification → Settings → Spam Protection.
- Enable the toggle Bot signup-cluster detection.
- Choose a Cluster sensitivity — Low, Balanced (recommended), or Strict.
- Customize the Cluster block rejection message.
- Click Save.
How to Tell Why a Signup Was Blocked?
Every block from any layer on this page is logged with its reason. Two places to check:
- Unverified Users → User List — when AI risk scoring is on, the Risk column shows the score and specific reasons for that one entry.
- Analytics dashboard — shows aggregate blocked-spam totals and the top blocked domains/reasons across a date range, so you can spot a rule that is firing more than expected.
Data Retention & Privacy
AI risk scoring and bot-cluster detection use short-lived counters (a rolling ten-minute window) that expire automatically and are never sent anywhere outside your server. Blocked and scored events are also written to the plugin’s verification-events log (the same log that powers the Analytics dashboard), which can include the email address, IP address, and the reasons for a score or block. This log is not currently pruned automatically by the Maintenance cleanup tools, which only manage pending unverified sign-ups — plan your own data-retention policy accordingly if you operate under GDPR or a similar regulation.