The Maintenance tab keeps your store clean by auto-deleting stale verification records, removing abandoned user accounts, and bringing lapsed sign-ups back via re-engagement reminder emails. All three features are off by default and run on background daily crons.
You’ll find them at WooCommerce → Email Verification → Settings → Unverified Users → Maintenance.
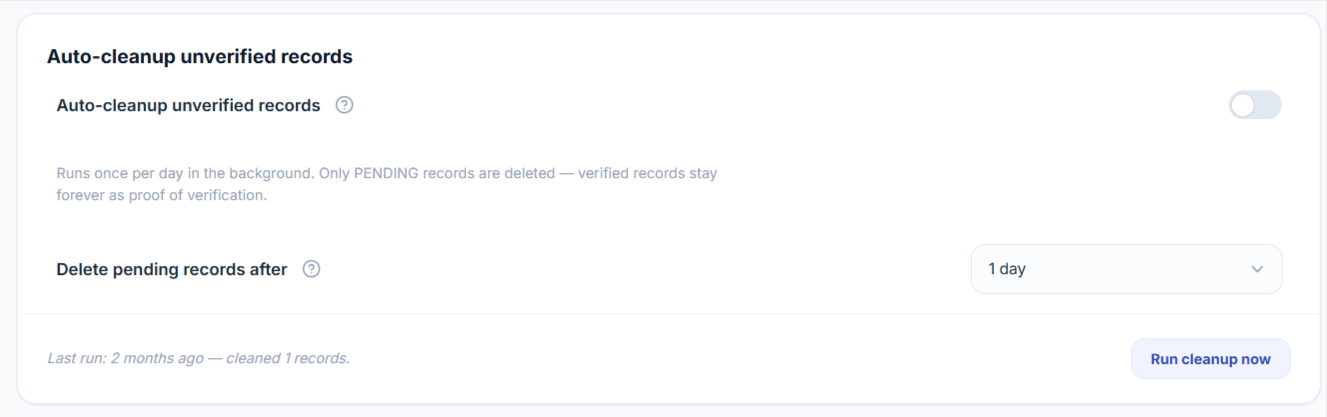
How to Auto-Cleanup Stale Verification Records?
The verification log table stores every email-verification attempt — including bot traffic and abandoned sign-ups. Auto-cleanup deletes the unverified rows after a configurable retention window so the table doesn’t grow unbounded.
- Go to WooCommerce → Email Verification → Settings → Unverified Users → Maintenance.
- Enable the toggle Auto-cleanup unverified records.
- Choose how long to keep pending records under Delete pending records after — 14 days (recommended), 30, 60, or 90 days.
- Click Save.
- (Optional) Click Run cleanup now to execute immediately instead of waiting for the daily cron.
How to Auto-Delete Unverified User Accounts?
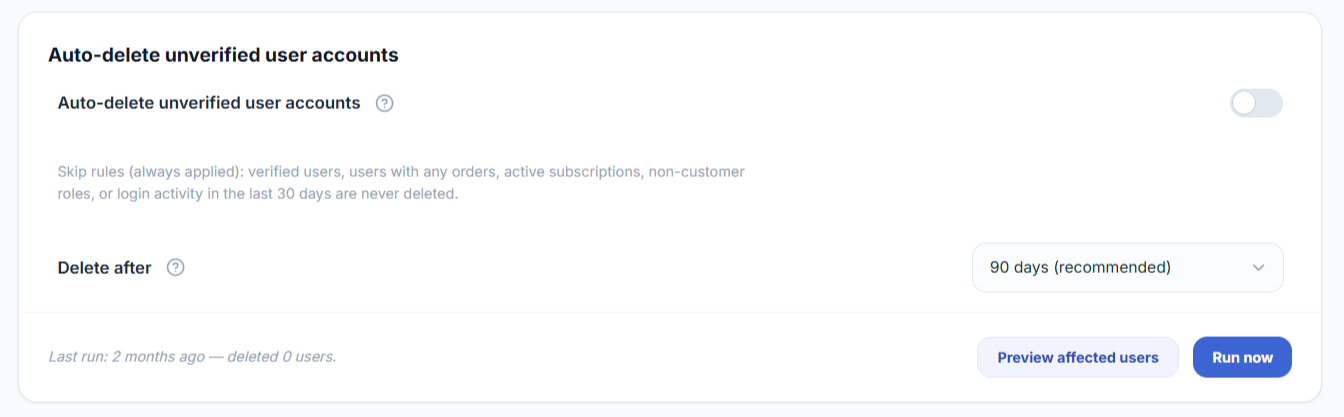
This permanently deletes WordPress user accounts that registered but never verified their email. It’s destructive — but ships with built-in safeguards so you can’t accidentally remove paying customers.
A user is never deleted if any of these are true:
- They have at least one order (any status)
- They have an active WooCommerce subscription
- They have any role other than customer or subscriber
- They’ve logged in within the last 30 days (measured from today, not from their registration date)
- They actually verified their email
To enable:
- Go to WooCommerce → Email Verification → Settings → Unverified Users → Maintenance.
- Enable the toggle Auto-delete unverified user accounts. A confirmation modal listing the safeguards will appear — read it and click Enable.
- Choose the retention window under Delete after — 30 days (the minimum), 60 days, or 90 days (recommended).
- Click Save.
- (Strongly recommended) Click Preview affected users to see exactly which users would be deleted on the next run, without deleting anything. This lets you sanity-check the safeguards before turning the cron loose.
- Click Run now when you’re ready, or wait for the daily cron.
How to Send Re-engagement Reminder Emails?
Bring back customers who started signing up but never completed email verification. The plugin emails them at the intervals you choose — 1 hour / 24 hours / 3 days / 7 days after sign-up — with a styled reminder and a one-click button to come back and finish.
- Go to WooCommerce → Email Verification → Settings → Unverified Users → Maintenance.
- Enable the toggle Send re-engagement reminder emails.
- Under Send reminder at, select one or more intervals.
- Click Save.
- Click Customize email → to edit the subject, heading, body copy, button text, button link, and footer through the email customizer (matches the same workflow as your other CEV emails).
- (Optional) Click Send test to email a sample to your admin address before going live.
- (Optional) Click Run now to fire the cron immediately.

How to Force Re-Verify All Customers?
The Force re-verify all customers tool flips every existing verified customer back to unverified in a single action. This is the recommended cleanup after a spam attack, after installing CEV Pro on a store that already has legacy accounts, or whenever you suspect the accounts list contains bots or stale data.
Requirements — and the setting people miss
Requires Customer Email Verification Pro to be installed and active, with WooCommerce also active.
When to use this tool
- After a spam attack – if your store was hit with mass bot signups, force re-verify is the fastest way to make every existing account prove ownership again. Real customers re-verify in one click; bots never come back.
- On a fresh install over legacy accounts – if you installed CEV Pro on a store that already had thousands of customers, those accounts were never asked to verify. Force re-verify retroactively adds the verification gate.
- After a data migration or import – if you bulk-imported customers from another platform and aren’t sure how clean the data is.
- Periodic security hygiene – some merchants run it once a year to flush abandoned accounts.
How to run the tool
- Go to WooCommerce → Email Verification → Settings → Unverified Users → Maintenance.
- Scroll to the Tools card.
- Read the description, then click the Force re-verify all customers button.
- A confirmation popup will show you how many customers will be affected — administrators, editors and shop managers are excluded from this count. Review the count, then confirm.
- The job runs in the background. The card updates with a “Last run” timestamp and a count of how many customers were processed when it finishes.
Force re-verify selected users only
If you only want to re-verify a subset of customers (instead of everyone), you can do it from the WordPress Users screen.
- Go to Users → All Users.
- Use the checkboxes to select the customers you want to re-verify.
- From the Bulk actions dropdown, choose Force re-verify selected users and click Apply.
The selected customers are flipped to unverified using the same logic as the bulk button, including the same requirement above — Require unverified logged-in customers to verify must be on for them to actually see a prompt. Same exclusions apply (administrators, editors and shop managers are skipped silently).
Both the store-wide button and this per-user action log a retroactive_unverify event, visible on the Analytics dashboard.