Configure email verification options by navigating to WooCommerce → Email Verification.
How to Enable Signup Verification?
Signup verification requires customers to verify their email address before their account is created.
- Go to WooCommerce → Email Verification.
- Toggle Enable Signup Verification to ON.
- Click Save Changes.
When a customer submits the registration form, they receive an OTP via email. The account is only created after successful verification of the OTP.
How to Enable Checkout Verification?
Checkout verification ensures customers verify their email before placing an order.
- Go to WooCommerce → Email Verification.
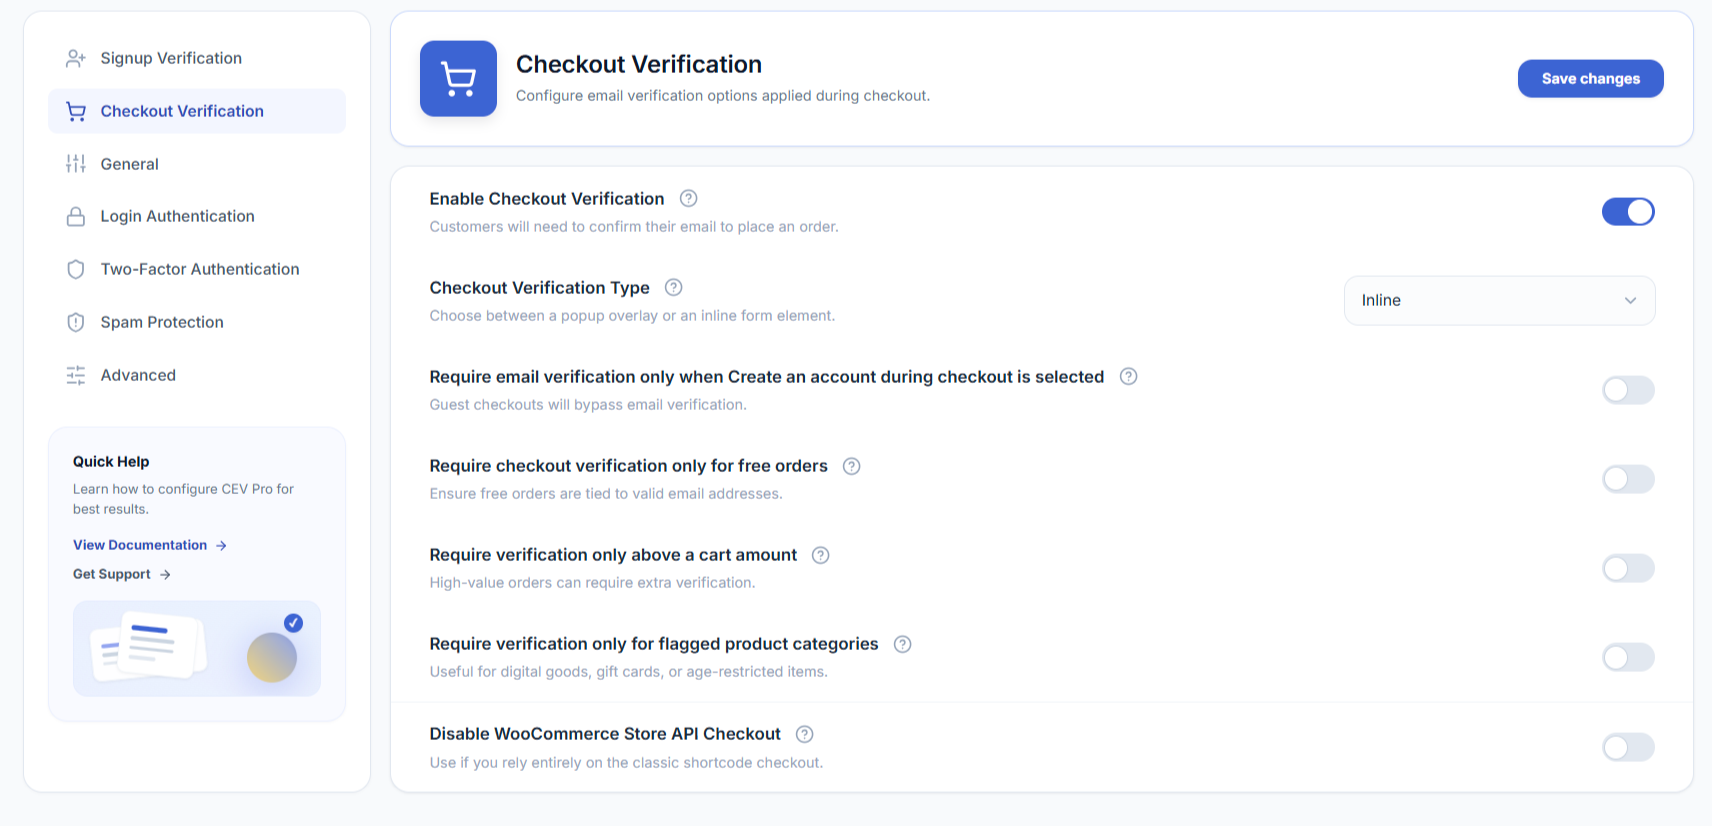
- Toggle Enable Checkout Verification to ON.
- Select the Checkout Verification Type:
- Popup: Opens a popup window for OTP entry
- Inline: Displays verification field directly on the checkout page
- Click Save Changes.
Additional Checkout Options
| Option | What it does | Default |
|---|---|---|
| Enable on cart page | Shows the verification step earlier, on the cart page — in addition to checkout, not instead of it. | Off |
| Free orders only | Require verification only when the order total is $0, to stop $0 placeholder orders being used to skip verification elsewhere. | Off |
| Create account during checkout | Only verify when the customer opts to create an account at checkout (inline mode only). Guest checkouts bypass verification. | Off |
| Disable Store API Checkout | Blocks WooCommerce’s Store API so it can’t be used to bypass verification. This also disables WooCommerce Blocks-based checkout and any headless/REST storefront — only use it if your store runs entirely on the classic shortcode checkout. | Off |
How to Enable Login Authentication?
Login authentication adds an extra security layer by requiring OTP verification for suspicious login attempts.
- Go to WooCommerce → Email Verification.
- Scroll to the Login Authentication section.
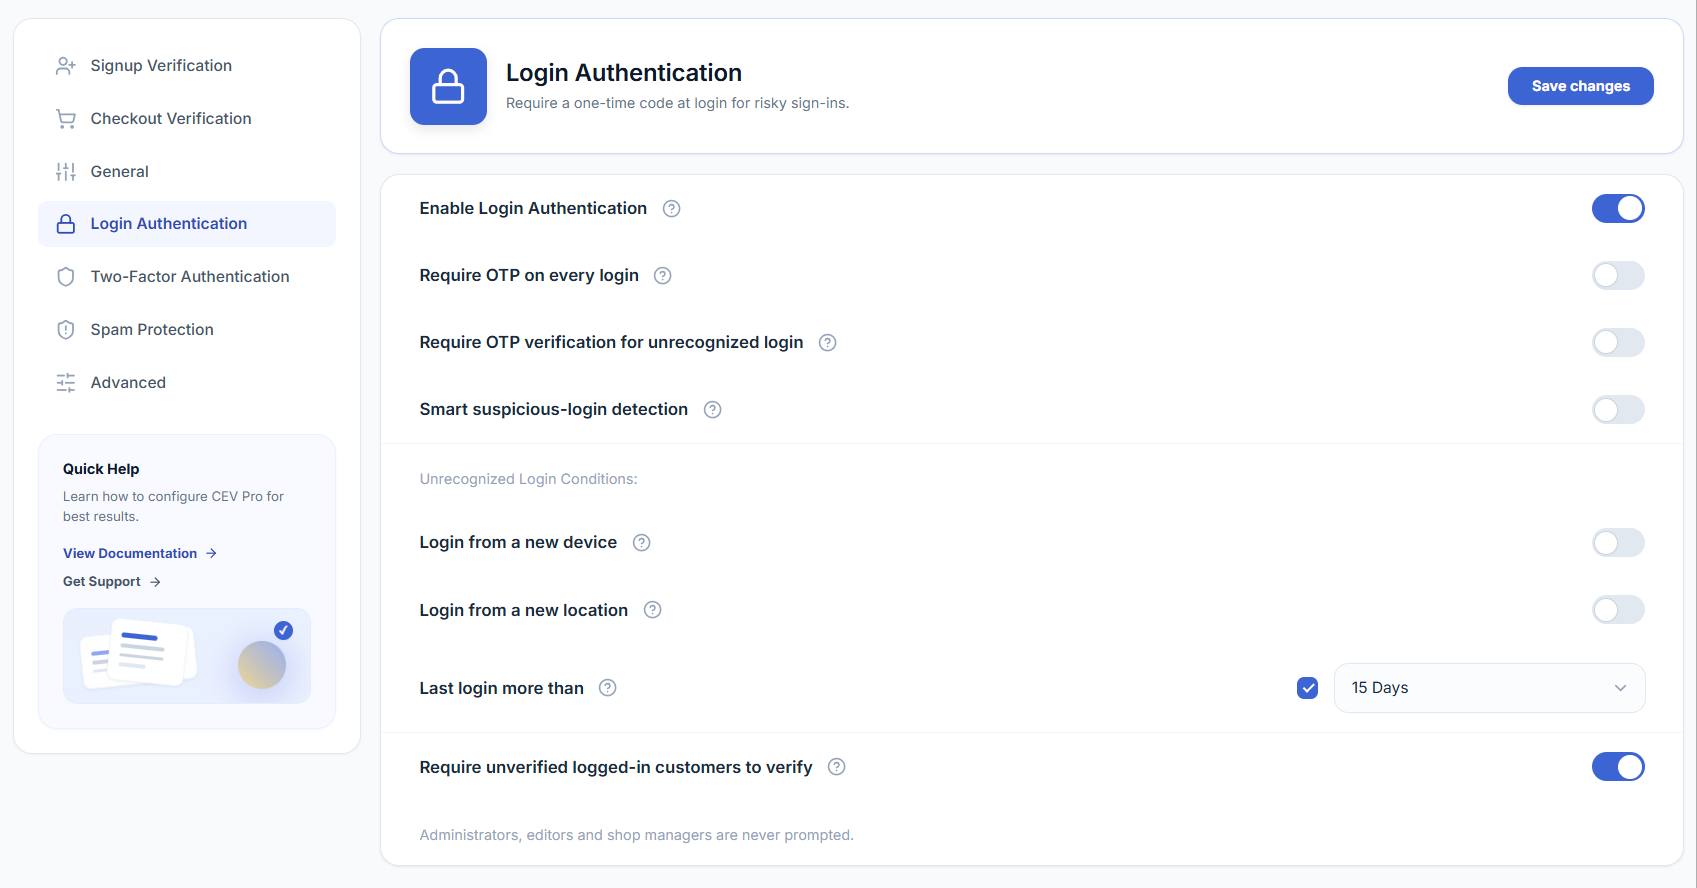
- Toggle Enable Login Authentication to ON.
- Enable Require OTP verification for unrecognized login.
- Select the conditions that trigger verification:
- Login from a new device
- Login from a new location
- Last login more than X days ago (15, 30, or 60 days)
- Click Save Changes.
How to Require OTP on Every Login?
By default, login authentication only asks for a code when a sign-in looks unfamiliar. If you would rather treat every sign-in the same way — for example on a store that has just been through a spam attack, or one holding sensitive wholesale pricing — turn on Require OTP on every login. Every customer is then emailed a one-time code at every sign-in, no matter how familiar the device or location.
- Go to WooCommerce → Email Verification.
- Scroll to the Login Authentication section.
- Make sure Enable Login Authentication is ON.
- Toggle Require OTP on every login to ON.
- Click Save Changes.
Smart Suspicious-Login Detection
Instead of challenging every new device or location change, Smart suspicious-login detection scores each sign-in — using signals like a new device, a new country, a burst of failed password attempts, or a long idle period — and only asks for a code when the sign-in looks genuinely risky. When this is on, it replaces the manual “new device / new location / X days” conditions above.
- Go to WooCommerce → Email Verification.
- Scroll to the Login Authentication section.
- Toggle Smart suspicious-login detection to ON.
- Choose a Detection sensitivity:
- Low — only clearly risky sign-ins
- Balanced — recommended default
- Strict — challenges on weaker signals
- Click Save Changes.
How to Configure OTP Settings?
Customize the OTP behavior for all verification types.
- Go to WooCommerce → Email Verification.
- Locate the General Settings section.
- Configure the following options:
| Setting | Options | Default |
|---|---|---|
| OTP Length | 4-digit or 6-digit code | 4-digit |
| OTP Expiration | Never, 10 min, 15 min, 30 min, 1 hour, 24 hours, or 72 hours | Never |
| Resend Limit | Allow 1 Attempt, Allow 3 Attempts, or Disable Resend | Allow 1 Attempt |
| Resend Limit Message | Custom message shown when the resend limit is reached | “Too many attempts, please contact us for further assistance” |
| Success Message | Message shown after successful verification | Plugin default success message |

Advanced: Paid-Order Gatekeeping
The Require a paid order to finish verification option (also called Paid-Order Gatekeeping) adds a third state to the standard verification flow. After a customer has confirmed their email via OTP, their account is held in a pending paid order state — counted as verified for login and checkout, but not yet fully activated — until their first genuinely paid WooCommerce order completes. CEV Pro provides this state and fires a completion hook on the paid order, so your own coupon, marketing-list, or membership integrations can decide when to release any perks they were holding back.
Requirements
Requires Customer Email Verification Pro to be installed and active, with WooCommerce also active. This feature is off by default and only takes effect once you explicitly enable it.
What it does (and what it doesn’t)
CEV Pro keeps things deliberately minimal. With this option ON, the plugin:
- Adds a third verification state – pending paid order – alongside the existing verified and unverified states.
- Writes that state at OTP success. When a new customer confirms their email, their account is marked pending paid order instead of verified.
- Flips the state to fully verified when the customer’s first genuinely paid order reaches processing, completed, or payment complete status.
- Fires the cev_paid_order_gatekeeping_completed action hook at the moment of the flip, so your own integrations can release any perks they were holding back (welcome coupons, marketing-list opt-ins, membership upgrades, etc.).
- Shows the state in the admin – the Users list verification column displays an orange clock badge for pending-paid-order customers (distinct from the green verified tick and the red unverified cross).
- Protects pending customers from automatic cleanup – the auto-delete unverified and re-engagement reminder crons skip them, because their email is already confirmed.
The hook fires with the user ID and where the flip came from:
add_action( 'cev_paid_order_gatekeeping_completed', function ( $user_id, $source ) {
    // $source is 'paid_order' (customer's first paid order completed)
    // or 'admin' (an admin used Force activate below).
}, 10, 2 );
What CEV Pro does not do on its own:
- It does not hold back the WooCommerce welcome / account-created email — that is sent normally at registration.
- It does not restrict login, checkout, browsing, or any standard WooCommerce flow. A pending-paid-order customer can shop and check out exactly like any verified customer.
- It does not automatically restrict coupons, discounts, or promotional campaigns. If you want those to wait for the paid order, listen to the hook from your own code or theme.
The three verification states
- Verified – email confirmed and (when this option is on) first paid order completed. Used for the strict Verified KPI in the Analytics dashboard and the green tick in the admin user list.
- Pending paid order – email confirmed via OTP, but no paid order yet. Counted as verified for login and checkout. Shown as an orange clock in the admin and as a separate bucket in the Analytics Verification Status widget.
- Unverified – email has not been confirmed at all (same as before).
How to enable Paid-Order Gatekeeping
- Go to WooCommerce → Email Verification.
- Open the Advanced section in the settings sidebar.
- Toggle Require a paid order to finish verification to ON.
- Click Save Changes.
The setting takes effect immediately for new signups. Existing customers keep their current verification status — they are not retroactively moved into pending paid order.
What counts as a “paid order”
- Any order with a total greater than zero that reaches the processing, completed, or payment complete status counts. This covers all standard payment paths: automatic-capture gateways (Stripe, PayPal, etc.) as well as manual gateways like Cash on Delivery, Bank Transfer (BACS), Cheque, and admin-created orders.
- Free / zero-total orders do NOT count. A $0 order (after coupons, member discounts, or free trials) does not satisfy the requirement. This prevents a spammer from unlocking perks with a $0 placeholder order.
- Cancelled, failed, refunded, or pending-payment orders do NOT count. Only successfully paid orders flip the status.
Admin override — Force activate
If you need to manually flip a pending-paid-order customer to fully verified — for example, you took payment offline, or you’re activating a VIP / staff account — you can do it from the WP Users screen.
- Go to Users → All Users.
- Select the customers you want to fully activate.
- From the Bulk actions dropdown, choose Force activate (skip paid-order requirement) and click Apply.
The selected pending customers are flipped to fully verified, and the same cev_paid_order_gatekeeping_completed hook fires with $source = 'admin', so any of your integrations that listen for it run as if the customer had completed a paid order. Customers who weren’t pending are skipped silently.
Troubleshooting
- Customer’s OTP keeps getting rejected — confirm they’re using the most recently sent code (each resend invalidates the previous one) and that it hasn’t passed the OTP Expiration you configured above.
- Verification email never arrives — check spam/junk first, then confirm your site’s outgoing mail (WordPress’s default mail relies on the server’s mail function, which many hosts throttle or block; an SMTP plugin is recommended). Also check the Resend Limit hasn’t already been reached for that address.
- Customer is stuck “unverified” despite entering a correct code — see Customer Management to look up their record, or manually mark them verified from the Users list.
- No verification popup appears on a Blocks-based checkout page — checkout verification is designed for the classic shortcode checkout. If your store uses the WooCommerce Checkout block, see Using Email Verification with the WooCommerce Checkout Block.