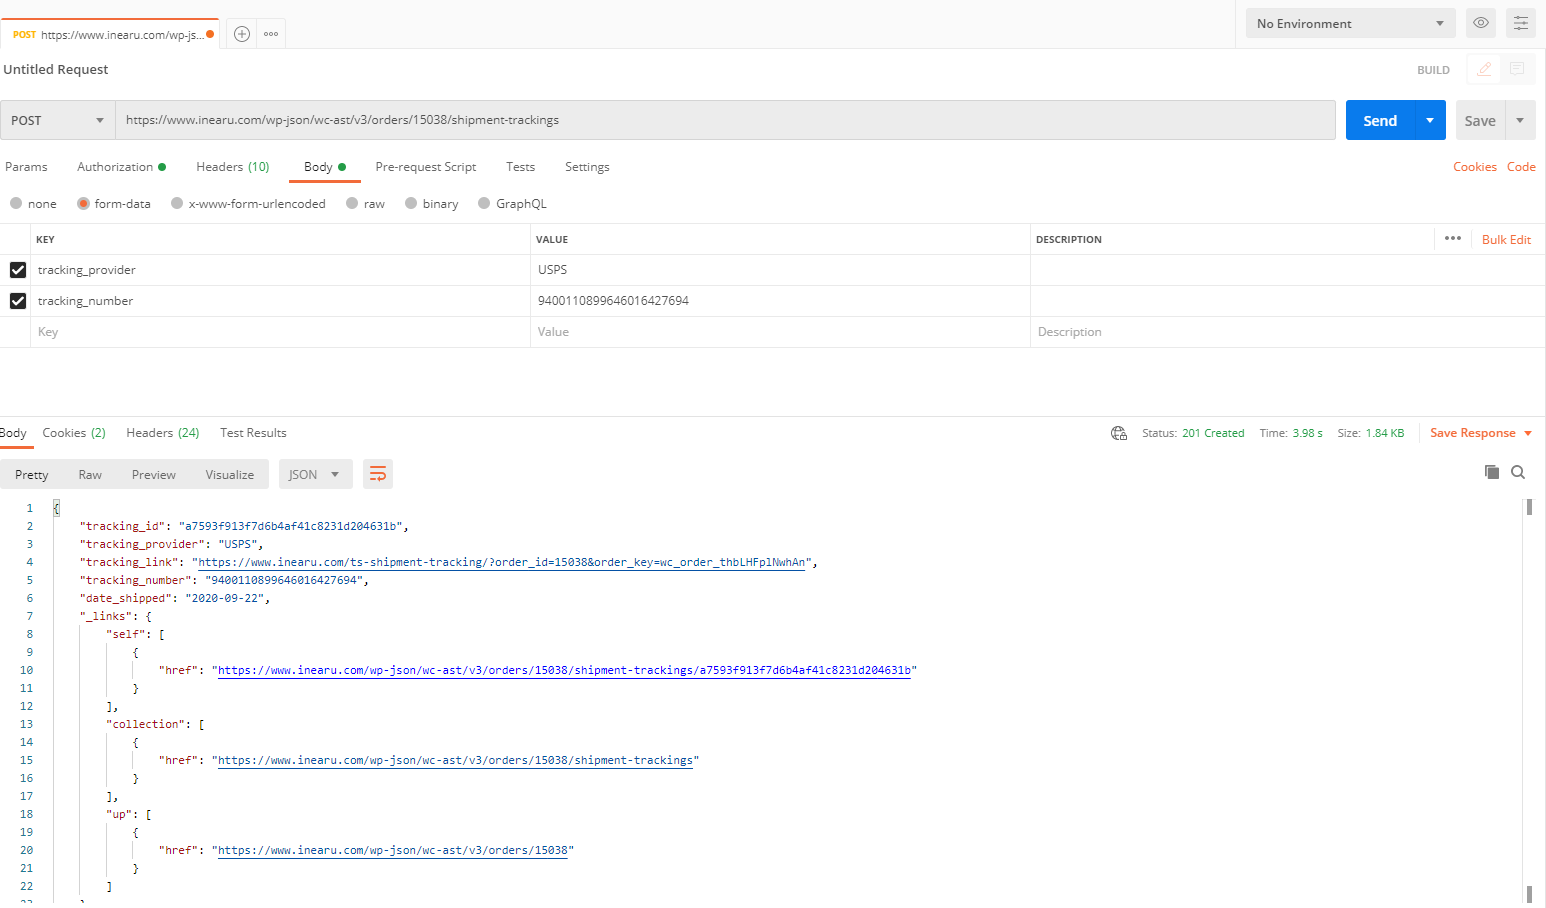
The WooCommerce REST API lets external apps read and write your store data over a set of endpoints. AST extends it with Shipment Tracking endpoints, so you can create, view and delete tracking information on orders from a shipping app, a label service or your own script.
Store-wide options for the API — the date format it expects and the request log — are on the Shipment Tracking API Settings page.
How to get WooCommerce API keys
To authenticate with the Shipment Tracking API you need a WooCommerce Consumer Key and Consumer Secret. These are standard WooCommerce REST API keys — AST doesn’t have keys of its own.
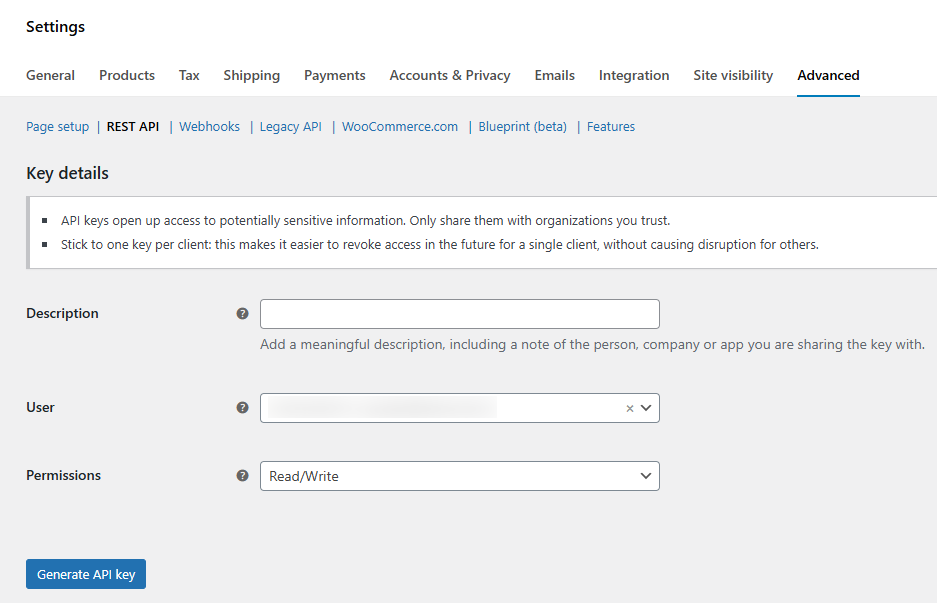
- In your WordPress dashboard, go to WooCommerce > Settings > Advanced > REST API.
- Click Add Key.
- Enter a description, for example “AST API access”.
- Choose a user. A user with administrator rights is recommended.
- Set Permissions to Read/Write.
- Click Generate API Key.
The Consumer Key and Consumer Secret are shown once. Copy and store them somewhere safe — you can’t view the secret again afterwards.
Endpoint and supported namespaces
All the examples on this page use the wc-shipment-tracking/v3 namespace:
https://your-domain.com/wp-json/wc-shipment-tracking/v3/orders/{order_id}/shipment-trackingsNote the plural shipment-trackings at the end — a request to shipment-tracking returns 404.
Shipment tracking properties
| Property | Type | Required | Description |
|---|---|---|---|
order_id | integer | Yes | The WooCommerce order ID. It goes in the URL, not the body. If you use a custom order number plugin, AST resolves your custom number too. |
tracking_number | string | Yes | The shipment tracking number. |
tracking_provider | string | Recommended | The shipping carrier. It must match the name of a carrier enabled in your store. If it doesn’t match one, AST saves the tracking number but can’t build a tracking link. |
date_shipped | string | No | The shipping date, in the format set by API Date Format — DD-MM-YYYY or MM-DD-YYYY. If you leave it out, AST uses today’s date. |
status_shipped | integer | No | What to do with the order status after the tracking is added. 0 — leave it unchanged (default). 1 — set the order to Completed (shown as Shipped if you renamed it). 2 — set the order to Partially Shipped. 3 — set the order to Updated Tracking. Values 2 and 3 only apply if you enabled that status in Order Statuses & Notifications. |
replace_tracking | integer | No | 0 — add this tracking alongside what’s already on the order (default). 1 — remove the existing tracking on the order first. |
sku | string | PRO only | Comma-separated SKUs, for per-item tracking. Available in AST PRO. |
qty | string | PRO only | Quantities matching the SKUs, for per-item tracking. Available in AST PRO. |
Carrier alias names — mapping the carrier name your system sends to a carrier in your list — are also a PRO feature. In the free plugin, send the carrier name exactly as it appears in your enabled carriers list.
Add shipment tracking to an order
Endpoint
POST /wp-json/wc-shipment-tracking/v3/orders/{order_id}/shipment-trackingsExample
curl -X POST https://your-domain.com/wp-json/wc-shipment-tracking/v3/orders/340/shipment-trackings \
  -u consumer_key:consumer_secret \
  -H "Content-Type: application/json" \
  -d '{
    "tracking_provider": "FedEx",
    "tracking_number": "12345678",
    "date_shipped": "08-03-2026",
    "status_shipped": 1,
    "replace_tracking": 1
  }'
The date_shipped above is in DD-MM-YYYY. If your store’s API Date Format is set to MM-DD-YYYY, send 03-08-2026 for the same day.
Response
"Tracking ID: fb7170d97d0e628bc3b565999d07c6a9"Get shipment tracking info
Endpoint
GET /wp-json/wc-shipment-tracking/v3/orders/{order_id}/shipment-trackingsExample
curl -X GET https://your-domain.com/wp-json/wc-shipment-tracking/v3/orders/340/shipment-trackings \
  -u consumer_key:consumer_secret
Response
{
  "tracking_id": "feb9bde4475fda92cc9408607b7ecb66",
  "tracking_provider": "FedEx",
  "tracking_link": "http://www.fedex.com/Tracking?action=track&tracknumbers=12345678",
  "tracking_number": "12345678",
  "date_shipped": "08-03-2026",
  "_links": {
    "self": [
      {
        "href": "https://your-domain.com/wp-json/wc-shipment-tracking/v3/orders/340/shipment-trackings"
      }
    ],
    "collection": [
      {
        "href": "https://your-domain.com/wp-json/wc-shipment-tracking/v3/orders/340/shipment-trackings"
      }
    ],
    "up": [
      {
        "href": "https://your-domain.com/wp-json/wc/v3/orders/340"
      }
    ]
  }
}
Delete shipment tracking
Endpoint
DELETE /wp-json/wc-shipment-tracking/v3/orders/{order_id}/shipment-trackings/{tracking_id}Example
curl -X DELETE https://your-domain.com/wp-json/wc-shipment-tracking/v3/orders/340/shipment-trackings/fa61d174a05d2f34323b51d92823947d \
  -u consumer_key:consumer_secret
Response
"Tracking ID: fa61d174a05d2f34323b51d92823947d"Get shipping carriers
Returns the carriers enabled in your store, grouped by country, with each carrier’s tracking URL pattern. Use it to check the exact carrier name to send in tracking_provider.
Endpoint
GET /wp-json/wc-shipment-tracking/v3/orders/{order_id}/shipment-trackings/providersExample
curl -X GET https://your-domain.com/wp-json/wc-shipment-tracking/v3/orders/340/shipment-trackings/providers \
  -u consumer_key:consumer_secret
Response
{
  "United States (US)": {
    "USPS": "https://tools.usps.com/go/TrackConfirmAction_input?qtc_tLabels1=%number%",
    "UPS": "http://wwwapps.ups.com/WebTracking/track?track=yes&trackNums=%number%"
  },
  "India": {
    "Delhivery": "https://www.delhivery.com/track/package/%number%"
  }
}
API request errors
| Status Code | Error | Description |
|---|---|---|
200 OK | Success | Request completed successfully. |
201 Created | Tracking added | Tracking was created on the order. |
400 Bad Request | Invalid request format | The request is malformed or a required field is missing. |
401 Unauthorized | Authentication failed | The API keys are missing, wrong, or don’t have Read/Write permission. |
403 Forbidden | Access denied | The user the key belongs to doesn’t have the right privileges. |
404 Not Found | Resource not found | The order ID doesn’t exist, or the endpoint is wrong — check for the plural shipment-trackings. |
500 Internal Error | Server error | Something failed on the server. Turn on the API log in the API settings and check WooCommerce > Status > Logs. |
Testing with Postman
- Set the method to POST and the URL to your endpoint, for example
https://your-domain.com/wp-json/wc-shipment-tracking/v3/orders/340/shipment-trackings. - Open the Authorization tab, set Type to Basic Auth, and enter your Consumer Key as the username and your Consumer Secret as the password.
- Under Headers, add
Content-Type: application/json. - Open Body, choose raw and JSON, and paste your request.
- Click Send. A successful call returns
201and a response containing a tracking ID.
{
  "tracking_provider": "UPS",
  "tracking_number": "1Z9999",
  "date_shipped": "10-07-2026",
  "status_shipped": 1
}