The WooCommerce REST API enable external apps use a set of API endpoints to read and write various parts of WooCommerce data. The AST plugin extends the WooCommerce Rest API and adds Shipment Tracking endpoints that allows to create, view, and delete shipment tracking information in orders.
To use the Shipment Tracking endpoint, you’ll need to generate a Rest API Key for your WooCommerce store. These API keys are the permission for external systems to connect with your store’s API.
🔐 How to Get WooCommerce API Keys
To authenticate with the Shipment Tracking API, you’ll need your WooCommerce Consumer Key and Consumer Secret.
🛠️ Steps to Generate API Keys:
- Go to your WordPress dashboard.
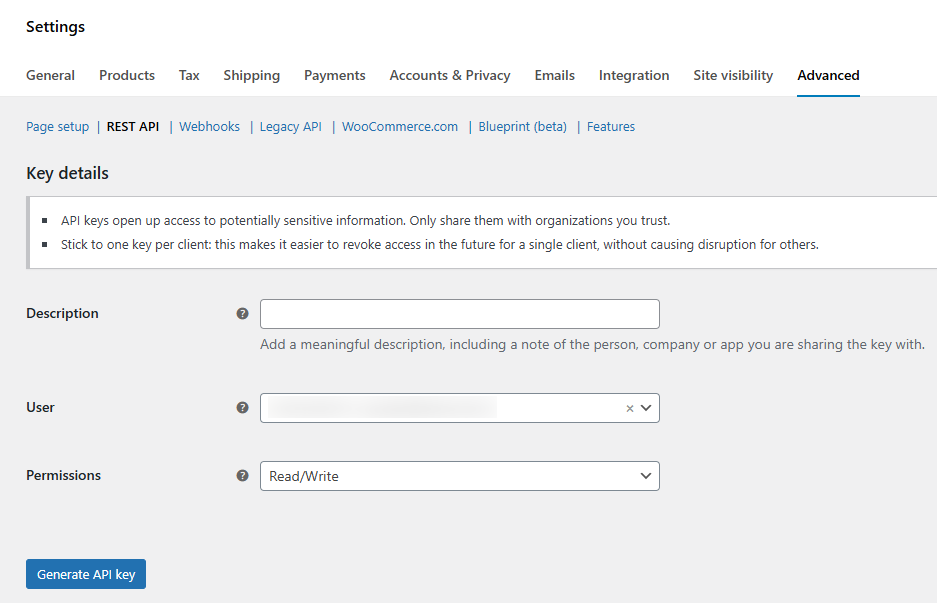
- Navigate to WooCommerce > Settings > Advanced > REST API.
- Click Add Key.
- Enter a name (e.g., “AST API Access”).
- Choose a user (with Admin rights recommended).
- Set Permissions to Read/Write.
- Click Generate API Key.
✅ You will now see your Consumer Key and Consumer Secret—copy and store them securely.
🧾 Shipment Tracking API Properties
| Property | Type | Required | Description |
|---|---|---|---|
order_id | integer | ✅ Yes | WooCommerce Order ID. |
tracking_provider | string | ✅ Yes | Shipping carrier (must match an enabled name or alias). |
tracking_number | string | ✅ Yes | Shipment tracking number. |
date_shipped | string | ✅ Yes | Date in format: DD-MM-YYYY or MM-DD-YYYY (must match API settings). |
status_shipped | integer | ✅ Yes | 0 – No change1 – Mark order as Shipped2 – Mark as Partially Shipped(Default: 0) |
replace_tracking | boolean | No | 0 – Add to existing tracking1 – Replace all tracking(Default: 0) |
sku | string | No | Comma-separated SKUs (for per-item tracking). |
qty | string | No | Quantities matching SKUs (for per-item tracking). |
🔄 Add Shipment Tracking to an Order
Endpoint:
https://yourdomaon.com/wp-json/wc-shipment-tracking/v3/orders/<order_id>/shipment-trackingsExample:
POST /wp-json/wc-shipment-tracking/v3/orders/<order_id>/shipment-trackings/

curl -X POST https://your-domain.com/wp-json/wc-shipment-tracking/v3/orders/<order_id>/shipment-tracking
	-u consumer_key:consumer_secret
	-H "Content-Type: application/json"
	-d '{
		"tracking_provider": "Fedex",
		"tracking_number": "12345678",
		"date_shipped": "2019-03-08",
		"status_shipped": 1,
		"replace_tracking": 1
	}'
Response:
"Tracking ID: fb7170d97d0e628bc3b565999d07c6a9"🔍 Get Shipment Tracking Info
Endpoint:
GET /wp-json/wc-shipment-tracking/v3/orders/<order_id>/shipment-trackings/Example:
curl -X GET https://your-domain.com/wp-json/wc-shipment-tracking/v3/orders/<order_id>/shipment-trackings
-u consumer_key:consumer_secret Response:
  {
  "tracking_id": "feb9bde4475fda92cc9408607b7ecb66",
  "tracking_provider": "Fedex",
  "tracking_link": "http://www.fedex.com/Tracking?action=track&tracknumbers=12345678",
  "tracking_number": "12345678",
  "date_shipped": "2019-03-08",
  "_links": {
    "self": [
      {
        "href": "https://your-domain.com/wp-json/wc/v1/orders/340/shipment-trackings"
      }
    ],
    "collection": [
      {
        "href": "https://your-domain.com/wp-json/wc/v1/orders/340/shipment-trackings"
      }
    ],
    "up": [
      {
        "href": "https://your-domain.com/wp-json/wc/v1/orders/340"
      }
    ]
  }
}
❌ Delete Shipment Tracking
Endpoint:
DELETE /wp-json/wc-shipment-tracking/v3/orders/<order_id>/shipment-trackings/<tracking_id>Example:
curl -X DELETE https://your-domain.com/wp-json/wc-shipment-tracking/v3/orders/340/shipment-trackings/fa61d174a05d2f34323b51d92823947d \
-u consumer_key:consumer_secret
Response:
"Tracking ID: fa61d174a05d2f34323b51d92823947d"🧭 Get Shipping Carriers
Endpoint:
GET /wp-json/wc-shipment-tracking/v3/orders/<order_id>/shipment-trackings/providersExample:
curl -X GET https://your-domain.com/wp-json/wc-shipment-tracking/v3/orders/340/shipment-trackings/providers \
-u consumer_key:consumer_secret
Response Sample:
{
  "United States (US)": {
    "USPS": "https://tools.usps.com/go/TrackConfirmAction_input?qtc_tLabels1=%number%",
    "UPS": "http://wwwapps.ups.com/WebTracking/track?track=yes&trackNums=%number%"
  },
  "India": {
    "Delhivery": "https://www.delhivery.com/track/package/%number%"
  }
}
❗ API Request Errors
| Status Code | Error | Description |
|---|---|---|
200 OK | Success | Request completed successfully. |
201 Created | Tracking Added | Tracking successfully created. |
400 Bad Request | Invalid Request Format | Request is malformed or missing required data. |
401 Unauthorized | Authentication Failed | API keys are missing, incorrect, or lack permissions. |
403 Forbidden | Access Denied | User lacks the correct privileges. |
404 Not Found | Resource Not Found | Order ID or endpoint does not exist. |
409 Conflict | Duplicate Entry | Tracking already exists without replace flag. |
500 Internal Error | Server Error | Server-side issue. Check logs or contact support. |
📬 Postman Example
To test using Postman:
- Method: POST
- URL:
https://your-domain.com/wp-json/wc-shipment-tracking/v3/orders/340/shipment-trackings- Authorization:
- Type: Basic Auth
- Username:
Consumer Key - Password:
Consumer Secret
- Headers:
Content-Type: application/json
Body → Raw → JSON:
{
"tracking_provider": "UPS",
"tracking_number": "1Z9999",
"date_shipped": "10-07-2024",
"status_shipped": 1
}✅ Click Send and confirm the response includes a Tracking ID.

Then go to the Authorization section and select Type Basic Auth. Use REST API Consumer key and consumer secret in the username and password field and click on Send.
