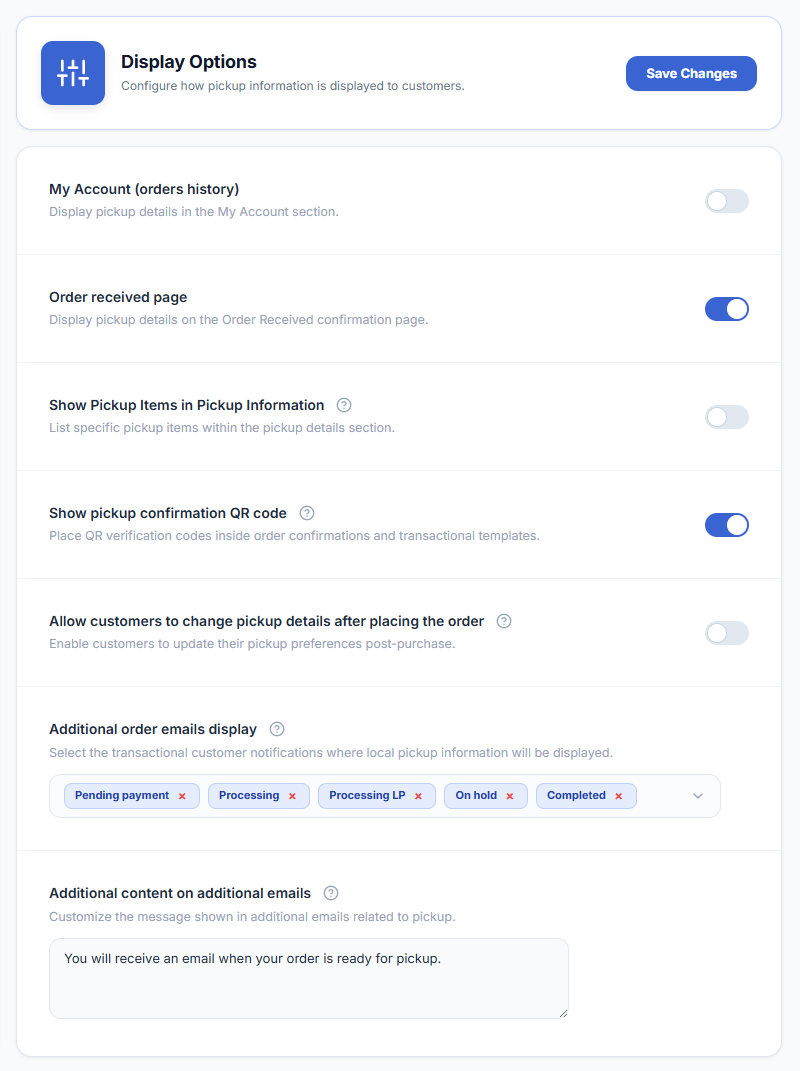
WooCommerce → Local Pickup Pro → Settings → Display OptionsDisplay options control where pickup location details appear for customers after they place an order. Enable all three for the best customer experience.
Location details are now visible on the My Account → Orders Details page. When this option is enabled, customers can navigate to their order history in My Account, open any past pickup order, and see the full pickup information widget — including the location name, address, business hours, and special instructions.
Location details are displayed on the Order Received page. When this option is enabled, the pickup information widget is shown on the thank-you / order confirmation page immediately after the customer completes checkout. This is the first page the customer sees after placing their order, so enabling this ensures they have all pickup details right away.
This option displays a list of pickup items in the pickup information section. When enabled, the pickup information widget also shows the specific products the customer has selected for pickup at that location. Disable it to hide item details from the pickup information.
This is especially useful when Pickup per Item is enabled and a customer has split their cart across multiple pickup locations — each location’s widget will show only the items assigned to it, making it clear to the customer what they need to collect from each place.
When this option is enabled, customers can go back into their order in My Account and change their pickup location or appointment details after the order has already been placed. This is useful if a customer needs to reschedule their pickup appointment or switch to a different location without having to contact your support team.
Sub-option: Limit Appointment Changes Before Pickup
When the main option above is enabled, a sub-option appears: Limit appointment changes before pickup. When this sub-option is ticked, customers can only change their appointment details up to a set amount of time before their scheduled pickup time. This prevents last-minute changes that your team may not be able to accommodate.
How to configure:
- Tick the Allow customers to change pickup details after placing the order checkbox.
- Tick the Limit appointment changes before pickup sub-option to enable the time limit.
- In the Allow appointment changes up to field, enter a number and select the time unit from the dropdown — options are Minutes, Hours, or Days.
- For example, setting this to 2 Minutes means customers can only change their appointment up until 2 minutes before their scheduled pickup time. After that point, the option to change is locked.
- Click Save Changes.
This option allows the display of pickup information in selected additional order status emails. You can also select to include pickup information in the New Order, Customer Note, and Customer Invoice emails.
By default, the plugin shows pickup information in the standard Processing email. This option lets you extend pickup information to other email types so customers always have access to their pickup details no matter which email they open.
How to configure:
- Click inside the Additional Order Emails Display field.
- Select the additional email types you want to include pickup information in — for example, Processing, New Order, Customer Note, or Customer Invoice.
- Each selected email type appears as a removable tag in the field. Click the × on any tag to remove it.
- Click Save Changes.
You have the option to insert extra content that will be included in the additional emails for orders where the Local Pickup shipping method was chosen. This custom message appears in the body of all the email types you selected in the Additional Order Emails Display field above.
Use this field to set customer expectations or provide extra instructions — for example:
“You will receive an email when your order is ready for pickup.”
How to configure:
- Click inside the Additional content on additional emails text area.
- Type your custom message.
- Click Save Changes.